

DIY Raspberry Pi Desktop Tower Case with OLED Stats Display
- Viral Dodhia
- Jul 24, 2022
- 2 min read

Hey friends in this video I will show you how to make 3D Printed Raspberry Pi 4 Desktop Case with OLED Stats Display Setup.
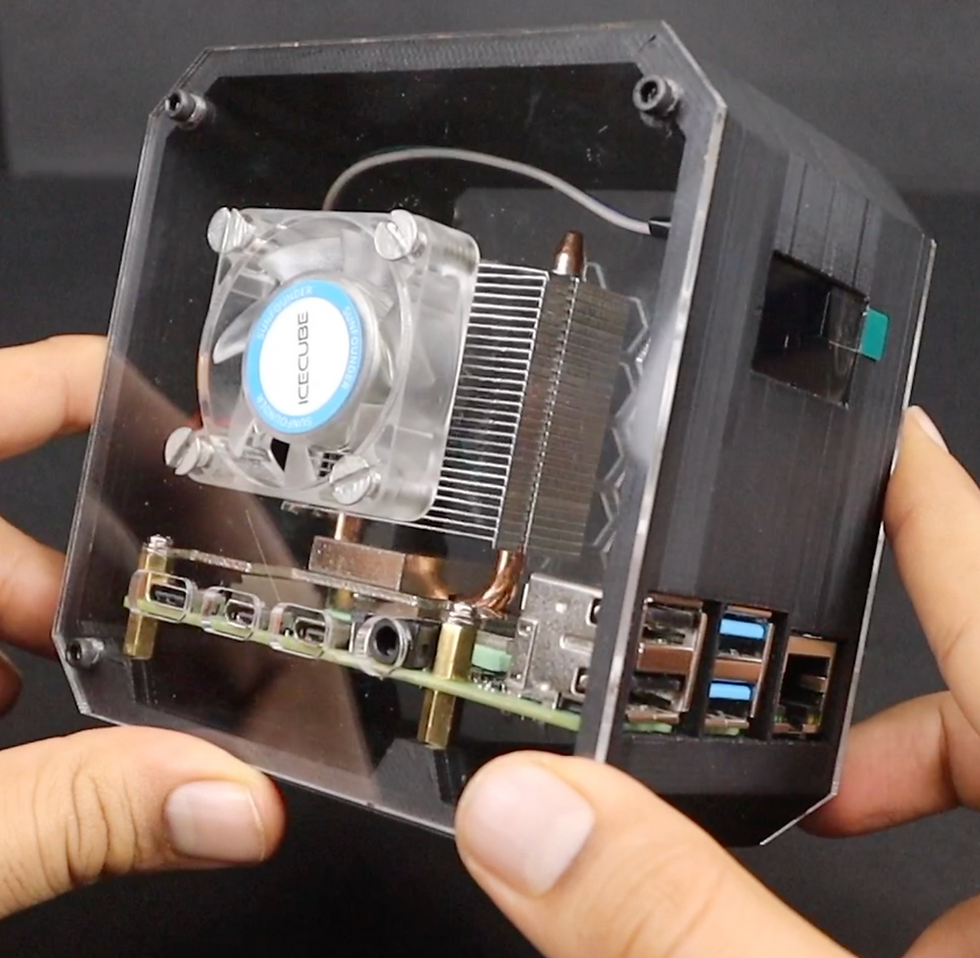
This mini Case is 3D Printed and sides are made of Clear Transparent Acrylic and it looks very awesome with the RGB Cooler Inside.
This ICECUBE Tower Cooler Does the job very well, maintains the temperature 33°C at normal use and at intense usage it goes around 50°C.
The OLED Stats Display shows information about the IP Address, CPU Usage, CPU Temperature, RAM Usage, Disk Usage.
All the connectivity ports of Raspberry Pi is accessible from the front and side of the case.
Project Credits:
Check this blog for more detailed tutorial
Thanks for such a Amazing Build
Materials:-
Raspberry Pi 4 Model B (8/4 GB RAM)
I2c OLED Display 0.96" White
Jumper Wires
ICECUBE Tower Cooler https://www.sunfounder.com/collections/main-products/products/sunfounder-raspberry-pi-cooling-fan
Amazon(US) https://amzn.to/3A6W3Cn
Amazon(DE):https://www.amazon.de/dp/B09QQ2JB21
Amazon(UK):https://www.amazon.co.uk/dp/B09QQ2JB21
Amazon(IT):https://www.amazon.it/dp/B09QQ2JB21
Amazon(FR):https://www.amazon.fr/dp/B09QQ2JB21
Amazon(ES):https://www.amazon.es/dp/B09QQ2JB21
Amazon(CA):https://www.amazon.ca/dp/B09Q8W89FG
3D Printed Desktop Case Files: Download Here
use support for the Port Holes

Desktop Case Sides: Download Here
Laser Cutting 2mm Clear Transparent Acrylic Sheet

Laser Cutting requires DXF files:
Installation of Raspbian OS
Download SD Card Formatter: https://www.sdcard.org/downloads/formatter/
It is used to properly Format and Erase Data from SD Card
Download Raspberry pi Imager: https://www.raspberrypi.com/software/
It is used to flash OS in SD Card
Download Raspbian OS: https://www.raspberrypi.com/software/operating-systems/
It is the official Raspberry Pi OS, Download the latest Version
Steps:
Erase Format the 32gb SD Card with the SD Card Formatter tool.
Use Raspberry Pi Imager and browse/Select the OS you downloaded
Select the SD Card
Flash the OS into SD Card
After successful Flashing, Eject the SD card and plug it into Raspberry Pi
Connect Display cable, Power Cable, Keyboard Mouse to Raspberry pi and Power on
Complete the Basic Setup as shown in video and Update the OS completely.
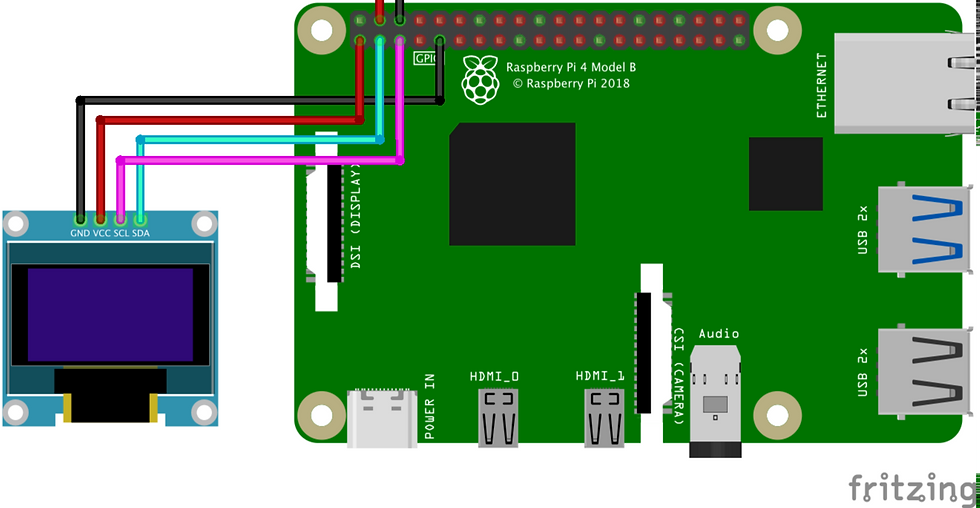
Connect OLED Display:
GND to Ground
VCC to 3.3V Power
SCL to SCL (GPIO 3)
SDA to SDA (GPIO 2)
OLED Stats Display Configuration:
Open the Terminal:
Update and Upgrade the Pi with following Commands and Reboot
sudo apt-get updatesudo apt-get full-upgradesudo reboot
Install Python
sudo apt-get install python3-pipsudo pip3 install --upgrade setuptools
Install the Adafruit CircuitPython library
sudo pip3 install --upgrade adafruit-python-shellwget https://raw.githubusercontent.com/adafruit/Raspberry-Pi-Installer-Scripts/master/raspi-blinka.py

sudo python3 raspi-blinka.pypress y and hit enter if any prompts to reboot.

Check if your I2c OLED Communication is detected
sudo i2cdetect -y 1you should see a table with 3c address for OLED Display

Install OLED Display Libraries
pip3 install adafruit-circuitpython-ssd1306sudo apt-get install python3-pil
Download the Python Script to display Stats
git clone https://github.com/mklements/OLED_Stats.git
Navigate to the downloaded directory
cd OLED_StatsRun the python script to display stats
python3 stats.py
Now you should see the stats on the OLED Display

Steps to Run Python script on startup automatically
Open crontab
crontab –eselect 1 and hit enter if any prompts

Add following line at the bottom of the script in crontab
@reboot python3 /home/pi/stats.py &
Copy the downloaded script files stats.py and PixelOperator.ttf from /home/pi/OLED_Stats to the location /home/pi

on terminal Press ctrl+x to save and exit
Press y and hit enter to save the crontab

If you followed all steps correctly then after every startup you can see the stats displayed in OLED Display
Assemble the Desktop:
Connect the ICECUBE Tower Cooler on Raspberry Pi and the RGB Fan on the side panel
Connect the OLED Display and fix it permanently with Hot Glue

Do the following connections for OLED Display and the Fan

Screw the side panels

And its Done!!
Connect the Display Cable, Power Cable, Keyboard Mouse and Power ON
